
Crème brûlée, the creamy custard dessert with its signature caramelized sugar crust, is a masterpiece of French cuisine. But what’s the secret of crème brûlée that makes it so irresistible? Is it the velvety texture, the perfect balance of sweetness, or the crackling sugar topping? In this article, we’ll dive deep into the art and science behind this iconic dessert. From the perfect custard base to the techniques for caramelization, you’ll discover everything you need to master the secret of crème brûlée. Whether you’re a beginner or a seasoned baker, this guide will help you create a dessert that’s nothing short of perfection.
The Allure of Crème Brûlée
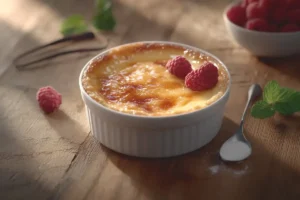
Crème brûlée isn’t just a dessert; it’s an experience. The moment your spoon cracks through the crispy sugar crust to reveal the silky custard beneath, you know you’re in for something special. But what makes this dessert so unique? The secret of crème brûlée lies in its simplicity—high-quality ingredients, precise techniques, and a touch of patience.
Interestingly, the dessert’s name translates to “burnt cream,” which hints at its defining feature: the caramelized sugar topping. However, achieving the perfect balance between the creamy custard and the crispy crust is where the real challenge lies.
A Brief History of Crème Brûlée
Before we dive into the secrets of crème brûlée, let’s take a quick trip back in time. While it’s widely regarded as a French dessert, its origins are a bit murky. Some believe it dates back to 17th-century France, while others argue it has roots in Spain or England. Regardless of its origins, crème brûlée has become a staple in fine dining and home kitchens worldwide.
This rich history adds to the dessert’s charm, making it not just a treat for the palate but also a conversation starter. After all, who wouldn’t want to impress their guests with a dessert that has such a storied past?
Why is Crème Brûlée So Special?
What sets crème brûlée apart from other desserts? For starters, it’s the contrast of textures—the crispy sugar crust against the smooth custard creates a sensory experience like no other. Additionally, the dessert’s versatility allows for endless flavor variations, from classic vanilla to exotic matcha or citrus-infused custard.
Moreover, crème brûlée is a testament to the art of baking. It requires precision, attention to detail, and a deep understanding of the science behind custard. Whether you’re a novice or a pro, mastering this dessert is a rewarding achievement.
The Perfect Custard Base
At the heart of every great crème brûlée lies its custard base—a delicate blend of cream, egg yolks, and sugar. But what makes this custard so creamy and luxurious? The secret of crème brûlée starts with understanding the science of custard.
When you heat cream and sugar together, the sugar dissolves, and the cream thickens slightly. Adding egg yolks introduces proteins and fats, which create a rich, velvety texture when cooked. However, the key is to avoid curdling, which happens if the custard gets too hot. That’s why a water bath (or bain-marie) is essential—it ensures gentle, even heating.
Pro Tip: Straining the custard mixture before baking removes any lumps, ensuring a smooth and silky texture.
The Role of Eggs in Custard
Eggs are the unsung heroes of crème brûlée. The egg yolks act as a natural thickener, giving the custard its creamy consistency. But here’s the catch: too many yolks can make the custard dense, while too few can leave it runny. The perfect ratio is typically 4-6 yolks per 2 cups of cream.
Additionally, the proteins in the yolks coagulate during baking, setting the custard. This is why temperature control is crucial—overheating can cause the proteins to tighten too much, resulting in a grainy texture.
The Magic of Cream and Sugar
The cream you use plays a significant role in the final texture of your crème brûlée. Heavy cream (with at least 36% fat) is ideal because it creates a rich, indulgent custard. For a lighter version, you can use half-and-half, but keep in mind that the texture won’t be as luxurious.
As for sugar, it’s not just a sweetener—it also helps stabilize the custard. Granulated sugar is the standard, but some bakers swear by vanilla sugar for an extra layer of flavor.
The Art of Caramelization
Once your custard is perfectly baked and chilled, it’s time for the pièce de résistance: the caramelized sugar topping. This step is where the secret of crème brûlée truly shines.
Caramelization is a chemical process that occurs when sugar is heated to around 340°F (170°C). At this temperature, the sugar molecules break down, creating a complex, nutty flavor and a crispy, glass-like crust.
Tools for Caramelization
To achieve the perfect caramelized crust, you’ll need the right tools. A kitchen torch is the most popular choice because it allows for precise control. Simply sprinkle a thin, even layer of sugar over the custard and torch it until it turns golden brown.
If you don’t have a torch, you can use your oven’s broiler. However, this method requires extra caution to avoid burning the sugar.
Common Caramelization Mistakes
Even experienced bakers can stumble when it comes to caramelization. One common mistake is using too much sugar, which can result in a thick, overly hard crust. Another is uneven heating, which leaves some spots undercaramelized while others burn.
To avoid these pitfalls, spread the sugar evenly and work in small sections if using a torch. And remember, patience is key—caramelization happens quickly, so keep a close eye on the process.
Ingredients You’ll Need
Before you start, gather all the essential ingredients for crème brûlée. Here’s what you’ll need:
- Heavy cream: 2 cups (for a rich, creamy texture).
- Egg yolks: 4-6 (depending on the desired richness).
- Granulated sugar: ½ cup (for the custard) + extra for caramelizing.
- Vanilla bean or extract: 1 bean or 1 teaspoon (for that classic flavor).
- Salt: A pinch (to enhance the sweetness).
Optional flavor variations:
- Citrus zest: Orange or lemon for a refreshing twist.
- Spices: Cinnamon or nutmeg for a warm, aromatic touch.
- Chocolate: Melted dark chocolate for a decadent version.
Step-by-Step Instructions
Step 1: Preparing the Custard Mixture
- Heat the cream: In a saucepan, warm the heavy cream over medium heat until it’s just about to simmer. Avoid boiling it, as this can affect the texture.
- Infuse flavor: If using a vanilla bean, split it lengthwise and scrape out the seeds. Add both the seeds and the pod to the warm cream. Let it steep for 10-15 minutes to infuse the flavor.
- Whisk the yolks: In a separate bowl, whisk the egg yolks and sugar until the mixture is pale and slightly thickened. This step incorporates air, ensuring a smooth custard.
Step 2: Combining and Straining
- Temper the eggs: Slowly pour the warm cream into the egg mixture while whisking constantly. This prevents the eggs from curdling.
- Strain the mixture: Use a fine-mesh sieve to strain the custard into a pouring jug. This removes any lumps and ensures a silky-smooth texture.
Step 3: Baking in a Water Bath
- Preheat the oven: Set it to 325°F (160°C).
- Prepare the ramekins: Place them in a deep baking dish. Divide the custard evenly among the ramekins.
- Create a water bath: Carefully pour hot water into the baking dish until it reaches halfway up the sides of the ramekins. This gentle, even heat prevents the custard from curdling.
- Bake: Transfer the dish to the oven and bake for 30-40 minutes, or until the edges are set but the center still jiggles slightly.
Step 4: Chilling the Custard
- Cool and refrigerate: Remove the ramekins from the water bath and let them cool to room temperature. Then, cover them with plastic wrap and refrigerate for at least 2 hours (or overnight). Chilling firms up the custard and enhances the flavors.
Step 5: Caramelizing the Sugar Topping
- Add the sugar: Just before serving, sprinkle a thin, even layer of granulated sugar over each custard.
- Torch the sugar: Use a kitchen torch to caramelize the sugar until it forms a golden-brown crust. Move the torch in circular motions to ensure even caramelization.
- Let it set: Allow the caramelized sugar to harden for a minute or two before serving.
Common Mistakes to Avoid
Even the most experienced bakers can run into trouble when making crème brûlée. Here are some common pitfalls and how to avoid them:
- Curdled Custard:
- Cause: Overheating the custard mixture.
- Solution: Use a water bath and bake at a low, steady temperature. Always temper the eggs by slowly adding warm cream to the yolks.
- Grainy Texture:
- Cause: Overcooking the custard or not straining the mixture.
- Solution: Bake until the edges are set but the center still jiggles slightly. Strain the custard before baking to remove any lumps.
- Burnt Sugar Topping:
- Cause: Holding the torch too close or for too long.
- Solution: Keep the torch moving in circular motions and maintain a distance of about 2-3 inches from the sugar.
- Uneven Caramelization:
- Cause: Uneven sugar distribution or inconsistent heat.
- Solution: Spread the sugar evenly and work in small sections if using a torch.
Expert Tips for Success
Want to take your crème brûlée to the next level? Here are some pro tips to ensure perfection:
- Use Room Temperature Ingredients:
- Cold eggs or cream can cause the custard to cook unevenly. Let all ingredients come to room temperature before starting.
- Strain the Custard Twice:
- For an extra-smooth texture, strain the custard mixture twice before baking.
- Chill Thoroughly:
- Don’t rush the chilling process. A well-chilled custard sets properly and makes caramelizing easier.
- Experiment with Flavors:
- While vanilla is classic, don’t be afraid to get creative. Infuse the cream with lavender, citrus zest, or even espresso for a unique twist.
- Invest in a Kitchen Torch:
- A kitchen torch gives you better control over caramelization compared to a broiler. Plus, it’s fun to use!
- Serve Immediately:
- Crème brûlée is best enjoyed right after caramelizing the sugar. The contrast between the warm crust and cold custard is part of the magic.
Flavor Variations for Crème Brûlée
While the classic vanilla crème brûlée is timeless, there’s plenty of room to get creative with flavors. Here are some delicious variations to try:
- Citrus-Infused Crème Brûlée:
- Add the zest of oranges, lemons, or limes to the cream while heating. The bright, tangy notes pair beautifully with the rich custard.
- Matcha Crème Brûlée:
- Whisk matcha powder into the custard mixture for a vibrant green hue and earthy flavor. This variation is perfect for tea lovers.
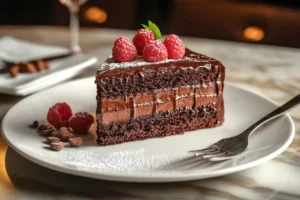
- Chocolate Crème Brûlée:
- Melt dark chocolate and mix it into the warm cream before combining with the egg yolks. The result is a decadent, chocolatey twist on the classic.
- Spiced Crème Brûlée:
- Infuse the cream with warm spices like cinnamon, nutmeg, or cardamom. These spices add a cozy, aromatic touch.
- Berry Crème Brûlée:
- Layer fresh raspberries, blueberries, or strawberries at the bottom of the ramekins before pouring in the custard. The burst of fruit adds a refreshing contrast.
Vegan and Gluten-Free Options
Yes, you can enjoy crème brûlée even if you’re vegan or gluten-free! Here’s how:
- Vegan Crème Brûlée:
- Replace the cream with coconut milk or cashew cream for a rich, dairy-free base. Use cornstarch or agar-agar as a thickener instead of eggs. For the sugar topping, stick with regular granulated sugar or use coconut sugar for a deeper flavor.
- Gluten-Free Crème Brûlée:
- The classic recipe is naturally gluten-free, but always double-check your ingredients to ensure they’re free from cross-contamination.
Seasonal Twists
Why not tailor your crème brûlée to the season? Here are some seasonal ideas:
- Pumpkin Spice Crème Brûlée (Fall):
- Add pumpkin puree and a dash of pumpkin spice to the custard for a festive autumn treat.
- Peppermint Crème Brûlée (Winter):
- Infuse the cream with peppermint extract and top with crushed candy canes for a holiday-inspired dessert.
- Lavender-Honey Crème Brûlée (Spring):
- Steep dried lavender in the cream and sweeten the custard with honey for a floral, springtime delight.
- Mango-Coconut Crème Brûlée (Summer):
- Use coconut milk as the base and layer diced mango at the bottom of the ramekins for a tropical twist.
Frequently Asked Questions
Crème brûlée is a dessert that sparks curiosity, and many people have questions about its preparation, history, and variations. Here, we’ll answer some of the most common questions based on the “People Also Ask” section.
1. What is the Secret to a Perfect Crème Brûlée?
The secret of crème brûlée lies in two key elements: the custard base and the caramelized sugar topping. For the custard, use high-quality ingredients like fresh cream, egg yolks, and real vanilla. Bake it in a water bath to ensure even cooking and a silky texture. For the topping, spread a thin, even layer of sugar and caramelize it with a kitchen torch or broiler until golden and crisp.
2. Can I Make Crème Brûlée Without a Torch?
Absolutely! If you don’t have a kitchen torch, you can use your oven’s broiler. Here’s how:
- Sprinkle a thin layer of sugar over the chilled custard.
- Place the ramekins on a baking sheet and position them under the broiler.
- Watch closely—it only takes 1-2 minutes for the sugar to caramelize. Be careful not to burn it!
While a torch offers more control, the broiler method works in a pinch.
3. How Long Does Crème Brûlée Last?
Crème brûlée is best enjoyed fresh, but it can be stored in the refrigerator for up to 3 days. Keep the custard covered with plastic wrap to prevent it from absorbing odors. However, wait to caramelize the sugar until just before serving, as the topping will soften over time.
4. What’s the Difference Between Crème Brûlée and Flan?
While both desserts feature a custard base, there are a few key differences:
- Texture: Crème brûlée has a firmer, creamier custard, while flan is softer and jiggly.
- Topping: Crème brûlée has a crispy caramelized sugar crust, whereas flan is topped with a liquid caramel sauce.
- Cooking Method: Crème brûlée is baked in a water bath, while flan is often steamed or baked with a caramel layer at the bottom.
5. Can I Make Crème Brûlée Ahead of Time?
Yes! In fact, making crème brûlée ahead of time can enhance its flavor. You can prepare the custard up to 2 days in advance and store it in the refrigerator. Just add the sugar topping and caramelize it right before serving.
6. Why Did My Custard Curdle?
Curdling usually happens when the custard is exposed to too much heat. To prevent this:
- Use a water bath to ensure gentle, even cooking.
- Avoid boiling the cream—heat it just until it’s warm.
- Temper the eggs by slowly adding the warm cream to the yolks while whisking constantly.
7. Can I Use Brown Sugar for the Topping?
While granulated sugar is traditional, you can experiment with brown sugar for a deeper, molasses-like flavor. Keep in mind that brown sugar caramelizes faster, so watch it closely to avoid burning.
8. Is Crème Brûlée Gluten-Free?
Yes! The classic crème brûlée recipe is naturally gluten-free, as it doesn’t contain any flour or gluten-based ingredients. However, always double-check your ingredients to ensure they’re free from cross-contamination.
9. Can I Freeze Crème Brûlée?
Freezing crème brûlée is not recommended. The custard’s texture can become grainy, and the sugar topping will lose its crispness. It’s best enjoyed fresh or refrigerated for a few days.
10. What’s the Best Way to Crack the Sugar Topping?
The signature crack of crème brûlée is part of its charm. To achieve it:
- Use the back of a spoon to gently tap the caramelized sugar.
- Apply even pressure to create a clean break without disturbing the custard underneath.
Mastering the Secret of Crème Brûlée
Crème brûlée is more than just a dessert—it’s a culinary masterpiece that combines simplicity with elegance. From its creamy custard base to its crispy caramelized topping, every bite is a celebration of texture and flavor. By now, you’ve learned the secret of crème brûlée: the perfect balance of high-quality ingredients, precise techniques, and a touch of patience.
Whether you’re a beginner or an experienced baker, mastering this dessert is a rewarding achievement. With the tips, tricks, and variations shared in this article, you’re well-equipped to create a crème brûlée that’s nothing short of perfection.
Why You Should Try Making Crème Brûlée at Home
Making crème brûlée at home might seem intimidating at first, but it’s easier than you think. Plus, the process is incredibly satisfying. Imagine the look on your guests’ faces when you serve them a restaurant-quality dessert that you made from scratch.
Not only is homemade crème brûlée delicious, but it’s also customizable. You can experiment with different flavors, from classic vanilla to exotic matcha, and tailor the dessert to your preferences.
Ready to put your newfound knowledge to the test? Gather your ingredients, preheat your oven, and start creating your own perfect crème brûlée. Don’t forget to share your creations with friends and family—or even on social media! Tag us in your posts; we’d love to see how your desserts turn out.
And if you have any questions or need further guidance, feel free to revisit this article or reach out in the comments. Happy baking!